To Top It All Off

Full Slabs of Granite copy

Meet me at the stone yard, honey! We need counter tops.

Selecting counter tops was one of the few decisions that we went into knowing what we wanted from the get-go and there really wasn’t much deliberation. For the kitchen and master bathroom, we chose granite in Absolute Black and for the hall bathroom we wanted something a little more fun, but with a timeless, neutral color palette.

The large pieces of Absolute Black granite had to be special ordered through a local stone yard, Rozelle Stone, but our hall bathroom vanity was a small enough surface that we could use a remnant piece if we found something we liked. So, one fine Sunday afternoon, Matthew, Miss Pepper and I went for a walk in the stone yard in search of “just the thing.”

There it is -- peeking out to say, "pick me!"

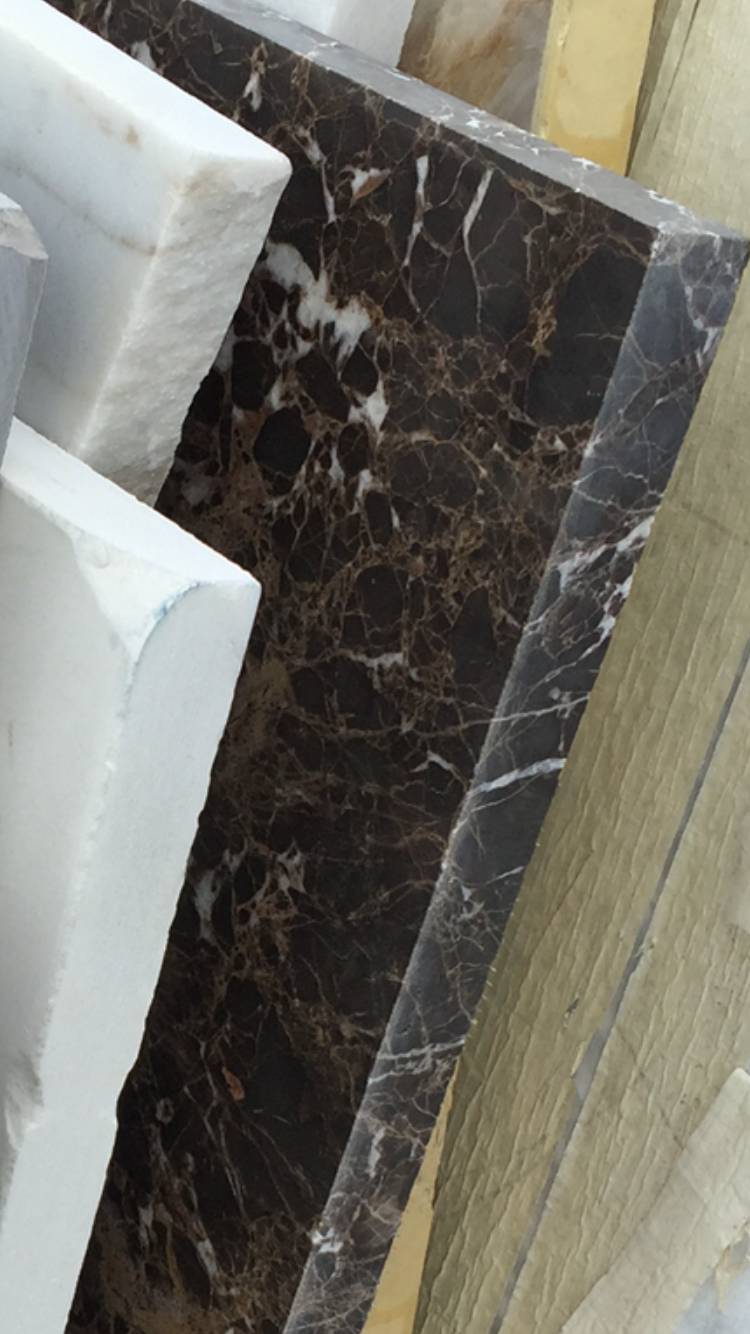
There it is — our little remnant peeking out to say, “pick me!”

…and we found it! Dark Emperador is the name of the marble we chose. It was just a lowly scrap, but it became the crown jewel of our hall bathroom vanity!

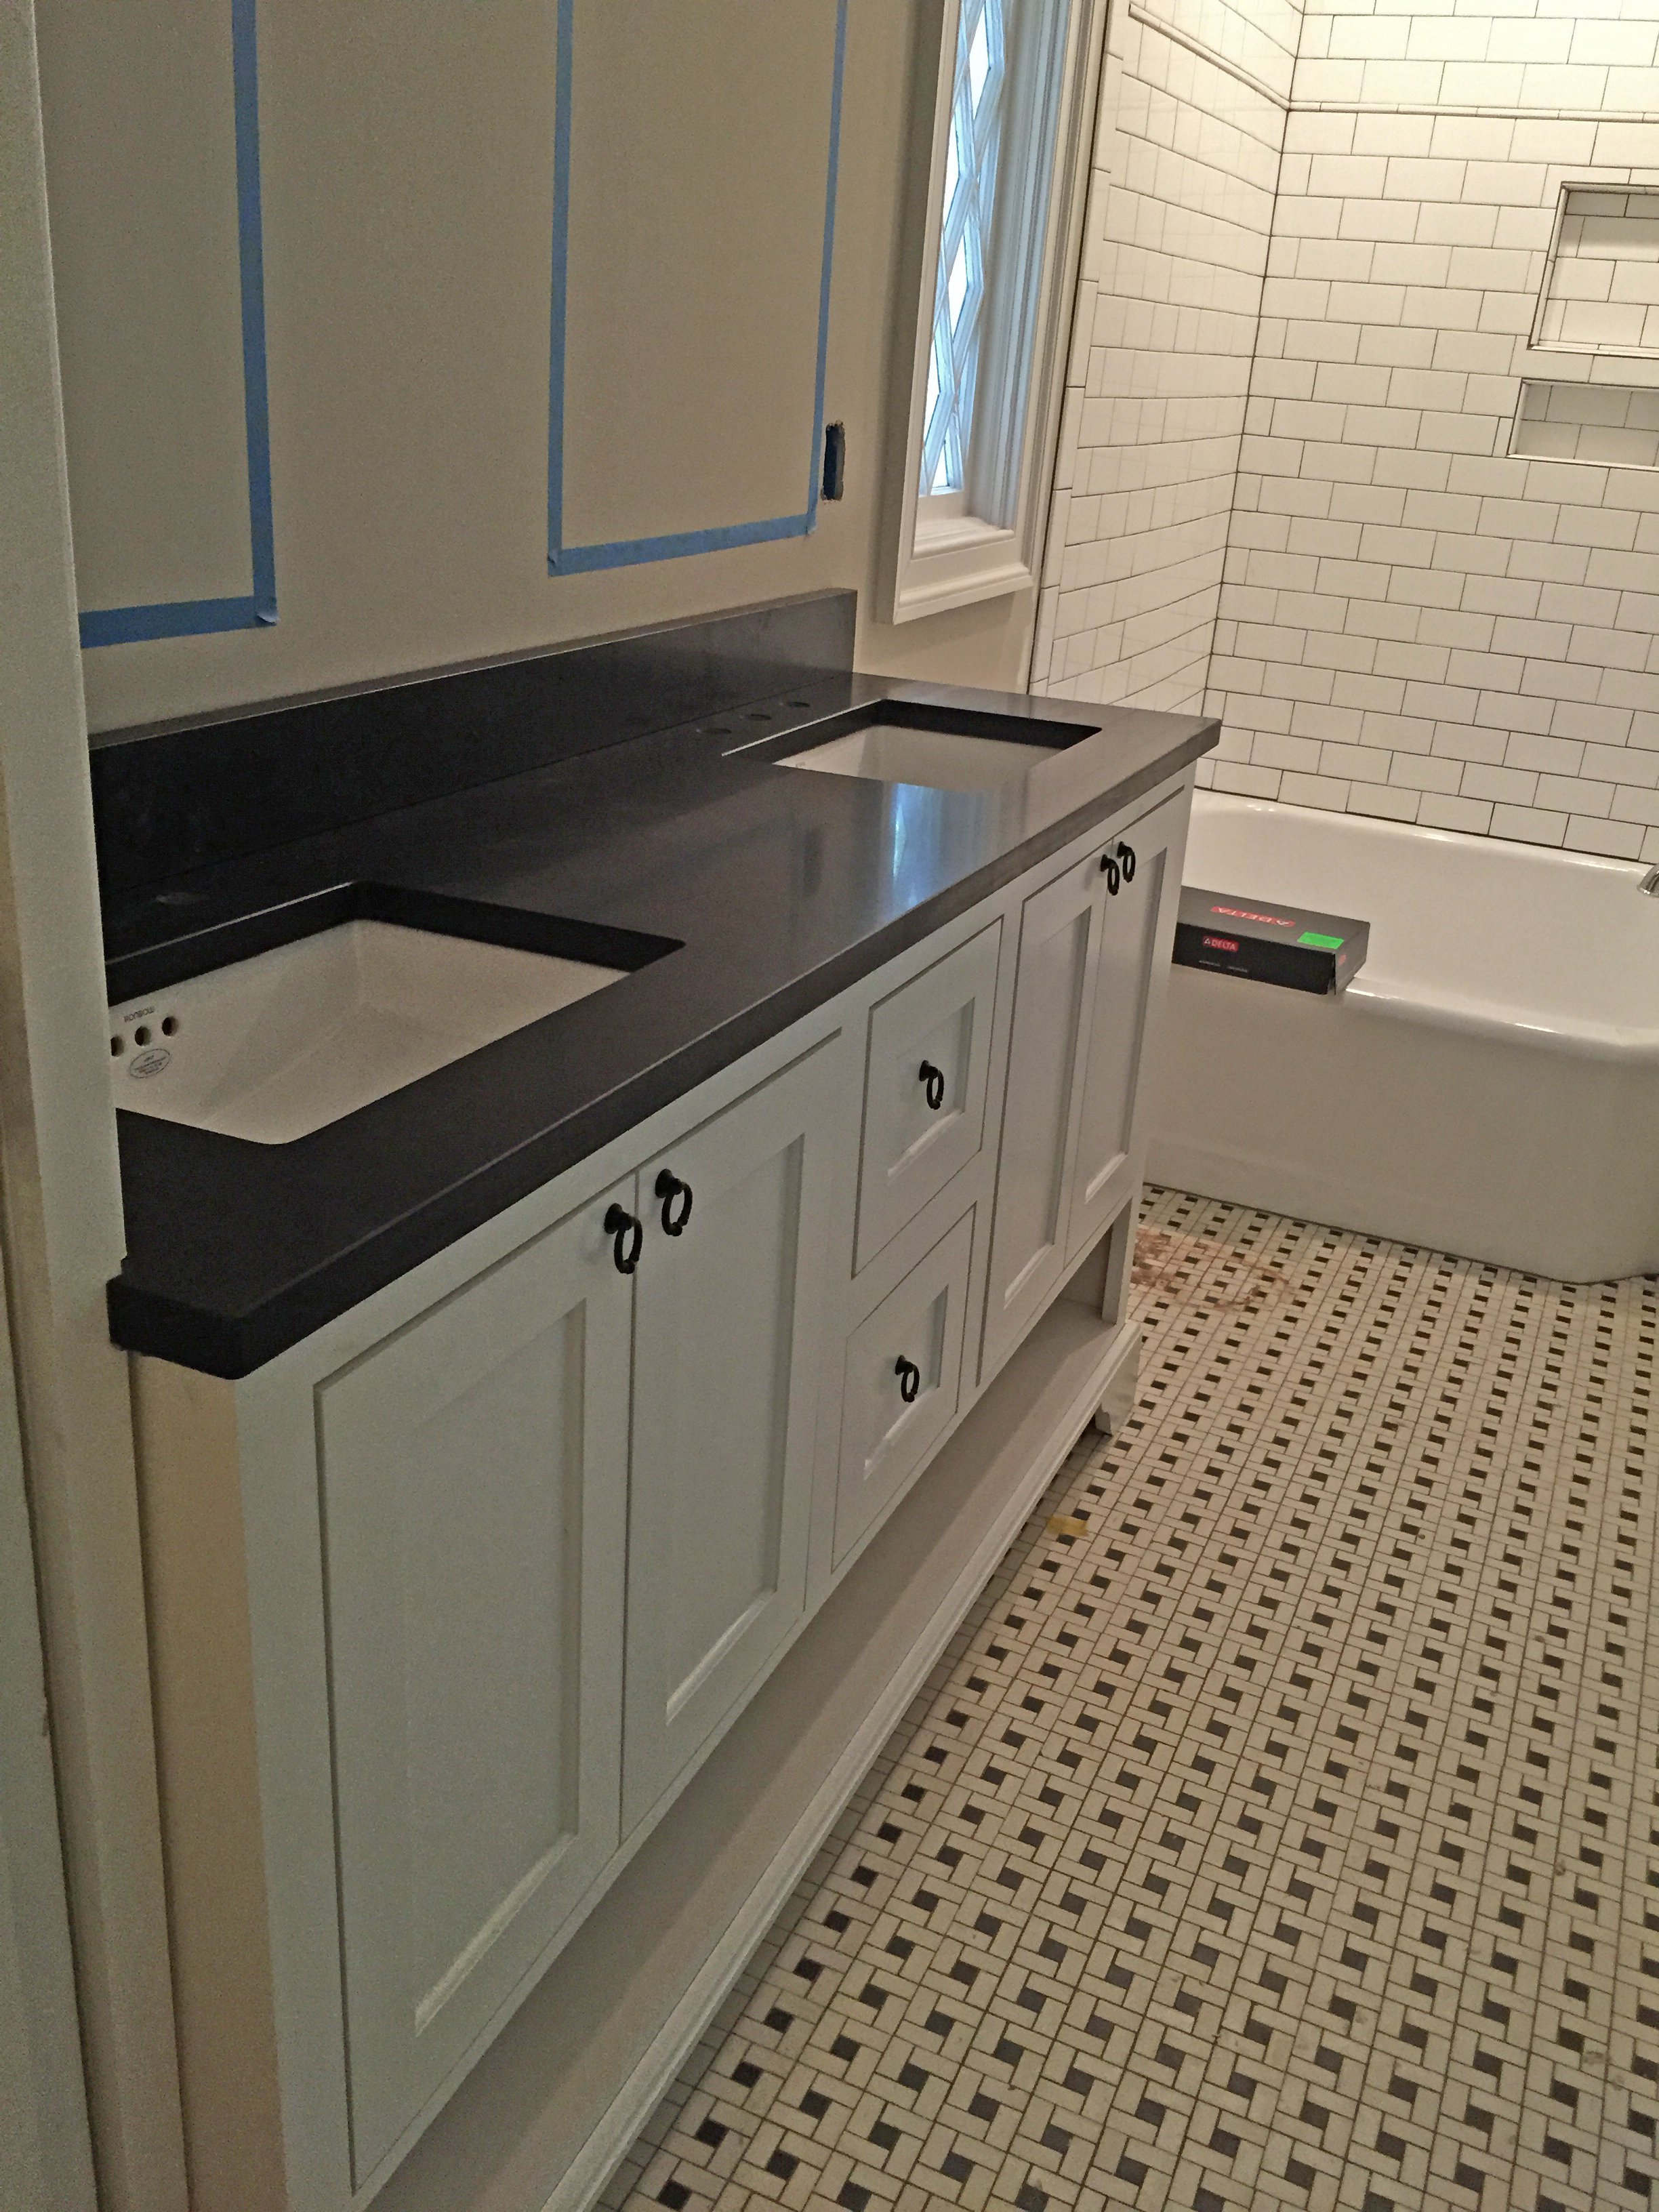
Here’s a peek at the finished product:

The Newton Nest Counter Top Install

The Newton Nest Counter Top Install

The Newton Nest Counter Top Install

The Newton Nest Counter Top Install

But the real star of the show is our Butler’s Pantry counter top… stay tuned for the full story of that transformation (it definitely deserves its own post!)  😉


Advertisement

Behold, New(ly refinished) Floors!

Besides the obvious benefit of being able to walk around in our house barefoot, we have brought the final “eyesore” of the nest back to its former glory. Behold, our rich, glossy, good-as-new hardwood floors!

It was quite the process to bring our 75 year old white oak and heart pine floors back to life. First, we patched-in new white oak in the great room where we built up the subfloor to match the height of the kitchen floor. We had to tear out and replace the floors in the kitchen and butler’s pantry/laundry room because the glue used to apply the linoleum we scraped up was toxic and couldn’t be sanded with the rest of the hardwoods. And finally, we had professionals sand, stain, and refinish the original wood flooring left in the majority of our house – white oak downstairs and heart pine upstairs.

Once the old floors are sanded down to the raw wood, they could almost pass as brand new! We thought it might be difficult choosing a stain color to make the floors feel old and “original” to our house, but our refinishing crew put down a few test patches and Matthew and I both liked the “Provincial” stain color. No contest; that was it. (Finally! An easy decision!!) “Onward!” we said, so down went the stain. Three coats of polyurethane later, we have a fabulous set of floors in the nest.

Lots of patching to do in the new hallway (routed through the old laundry closet and guest bedroom closet).

Lots of patching to do in the new hallway (routed through the old laundry closet and guest bedroom closet).

The Newton Nest Floor Refinishing IMG 001

The Newton Nest Floor Refinishing IMG_0007

Hall patching complete!

Hall patching complete!

Hall bathroom patched! (We moved the doorway about 18" to the right, leaving a gap in the hardwoods).

Hall bathroom patched! (We moved the doorway about 18″ to the right, leaving a gap in the hardwoods).

Test patch to discover what species of wood we have under all that gunk. White oak it is!

Test patch to discover what species of wood we have under all that gunk. The answer:  white oak!

The Newton Nest Floor Refinishing 004

New hardwoods going down in great room and kitchen.

Progress!

Progress!

Butler's pantry floors are installed.

Butler’s pantry floors are installed. (The tan goopy stuff that looks like peanut butter is actually a filler the floor professionals use to fill gaps and help join the new wood to the old in the most seamless way. The filler takes the stain just like wood!

Installation complete!

Installation complete!

Miss Pepper approves.

Miss Pepper approves.

Let the sanding begin!

Let the sanding begin!

The miracle machine!

The miracle machine.

Sanding in progress... can you believe the difference??

Sanding in progress… can you believe the difference??

All the noble sanding pads sacrificed to make our floors look good as new!

All the noble sanding pads that sacrificed their grit to make our floors look good as new! (The floor guys said our floors were the worst they’d seen and that the finish just turned to goop on the pads. They had to sand them twice as much as “normal” jobs. Eeeek! Sorry guys…from the beginning, this has been no ordinary job.)

Testing stains.

Testing stains.

Test patches -- the bottom left was our winner, Minwax's "Provincial."

Test patches — the bottom right was our winner, Minwax’s “Provincial.”

Peeking through the front door at the stain! (We weren't allowed to walk on the floors, but you couldn't keep us away! :) )

Peeking through the front door at the stain! (We weren’t allowed to walk on the floors, but you couldn’t keep us away! 🙂 )

Peeking in the french doors at the dining room.

Peeking in the french doors at the dining room.

Peeking in the dutch door at the great room.

Peeking in the dutch door at the great room.

Polyurethane is down. Our floors look brand new!

Polyurethane is down. Our floors look brand new!

The Newton Nest Floor Refinishing IMG_0051

IMG_0050

The Newton Nest Floor Refinishing IMG_0049

Upstairs, too! These floors are all heart pine and were treated with one coat of poly first, then stained with a mix of stain (red mahogany) and polyurethane to recreate the look of aged heart pine. We had to use this method because pine is notorious for staining very unevenly. So, essentially, we stained the first coat of poly instead of the raw wood. This gave it an even, naturally aged pine color.

Upstairs, too!
These floors are all heart pine and were treated with one coat of poly first, then stained with a mix of stain (red mahogany) and polyurethane to recreate the look of aged heart pine. We had to use this method because pine is notorious for staining very unevenly. So, essentially, we stained the first coat of poly instead of the raw wood. This gave it an even, naturally aged pine color to match the ceiling.

Miss Pepper says, "When can we move in??"

Miss Pepper says, “When can we move in??”


A Climate Controlled Nest

If you’ve ever lived (or even vacationed) with Matthew Newton, then you know he is king of the thermostat! So, obviously, quality climate control is a high priority in the Newton Nest.

True to form, we have completely removed all the old ductwork and reconfigured the HVAC system in our little nest. The most drastic change between new and old is the relocation of the furnace and a/c unit from the basement to the attic. Why, you say? Because the original ductwork – all running from the downstairs up – was not up to code (too small, weak and no real intake registers). So, to install new, updated ducts in the original layout required us to run large intake ducts through the laundry room and two of the downstairs bedroom closets. Losing all that storage space was a total deal breaker for us. So, cue the creative thinking caps!

Side Note: Matthew hates to be hot, so he keeps the 'stat set pretty low year-round. So low that Miss Pepper sometimes has to wear her winter hat to keep warm!

Miss Pepper’s creative cap also keeps her warm when her dad cranks up the air conditioning!

Our solution was to run all the new stuff from the upstairs down, so we could route all the ductwork through the attic, putting vents in the ceilings of the downstairs instead of along the baseboards. This setup is pretty unusual for our area, but it’s very common to have heating and cooling units in the attics of homes on the coast. The only concession we had to make to accommodate this arrangement was cutting through three out of the four dormers upstairs to allow for ductwork. Yes, this was less than ideal, but we decided it was much more appealing to sacrifice space in the upstairs bonus room rather than our main living areas downstairs – plus, we will gain some super cute window seats in these little nooks to conceal the ductwork. Not a bad trade, right??

Here's a look at the heart of our HVAC system tucked away in the attic. :)

Here’s a look at the heart of our HVAC system tucked away in the attic. 🙂

Ductwork going in!

Ductwork going in!

It's all hiding up there in the ceilings...

It’s all hiding up there in the ceilings…

Ductwork running through the dormers.

Ductwork running through the dormers.

Can you picture a cute little window seat here?

Can you picture a cute little window seat here?

Vents installed in the ceilings.

Vents installed in the ceilings.

Now we just need to pick out our thermostat!
We feel like this one might be calling our names….

It's called "The Nest" -- how could we resist?

It’s called “The Nest!”  How could we resist?  😉

Out with the old, in with the new – brand new windows to take in the views!

This is a game changer, y’all! We searched and researched, discussed and debated window styles, brands, and what best suited the era and architecture of our little nest. If you’ve ever shopped for windows, then you know – it’s a lot to take in.

Matthew and I felt like we deserved a graduate degree in window terminology by the time we had made our final selection. Muntins, Mullions, and Mullings, oh my! The lingo is intense, but all very interesting…

So, for those of you who speak this language and are interested in the details of what we chose: Matthew and I went with Windsor brand windows, a double-hung, aluminum clad wood, architectural grade window with simulated divided light in a “six over six” light pattern with muntins (or grilles) on the inside, outside, and in-between the glass.

Or this:

Windsor Window

Basically, we went super traditional. We were set on keeping the new look as close to the original true divided light wood windows as possible. Windsor also gives you the option to have exterior trim added to the window at the factory, which was very appealing to us since none of the original window trim was salvageable. Brand new windows + trim =  instant gratification! Easy decision. 🙂

Although most of the original windows were far beyond repair, we were able to save two of the most special ones and have them restored by a local company. The little round one in our master bedroom and the master bathroom window with a diamond pattern were definitely worth keeping!

Here’s a look at the removal and installation process:

Removing the old windows!

Removing the old windows!

aIMG_7299

aIMG_7307

First window is about to go in...

First window is about to go in…

Yay! Master bedroom window is in.

Yay! Master bedroom window is in.

All front windows are installed.

All front windows are installed.

aIMG_7324

aIMG_7348

Rear windows going in! (This is our Great Room / rear entrance.)

Rear windows going in! (This is our Great Room / rear entrance.) We added the round window after we vaulted the ceiling in this room and added two casement windows in place of a bank of three double hung windows because our TV will go against this wall. 🙂


Side yard windows are in!

Side yard windows are in!

All rear windows are installed.

All rear windows are installed.

aIMG_7343

View from the inside (Formal Living Room).

View from the inside (Formal Living Room).

Master Bedroom

Master Bedroom

Great Room / Kitchen

Great Room / Kitchen

Master bathroom window was restored, but hasn't been installed yet. Can't wait to see this one go in!

Master bathroom window was restored, but hasn’t been installed yet. Can’t wait to see this one go in!

Miss Pepper has found her new favorite vantage point... no squirrel is safe!

Miss Pepper has found her new favorite vantage point. Look sharp, Aberdeen Drive! She takes her Neighborhood Watch duties very seriously…

Halloween on Aberdeen

HAPPY HALLOWEEN
from Aberdeen!

The Newtons trying to meet some of our neighbors. (Judging by her expression, Miss Pepper must have seen a shockingly awesome costume walk by as this photo was snapped.)

The Newtons trying to meet some of our neighbors. (Judging by her expression, Miss Pepper must have seen a shockingly awesome costume walk by as this photo was snapped.)

Our first neighborhood event! One of the many reasons we love our Nest is that it’s located on a wonderful street with lots of great families and a group of neighbors who organize fun, street-wide activities. Halloween is the first of these activities we have been able to be a part of, so we decided to take this opportunity to meet more of our neighbors by participating in the Halloween festivities. And, of course, we couldn’t leave Miss Pepper out of the trick-or-treat fun, so she joined us as a Candy [Pepper] Corn.

Our little Candy PepperCorn.

Our little Candy PepperCorn.

P.S. Isn’t it fitting that our first official holiday as Aberdeeners is Halloween?? I mean, hands-down, we have the spookiest house on the street. 😉

...a little spooky, but we still love it! ;)

…a little spooky, but we still love it! 😉